How To Calibrate Your Monitor
Materials Needed:
- Monitor Calibration
Device
Calibrating your monitor to Full Color is not required; unless you choose to manage your own color. If you wish to calibrate to Full Color you must:
- Have a good quality monitor.
- Maintain controlled and consistent room lighting.
- Perform monitor calibration on a regular basis using a qualified calibration tool.
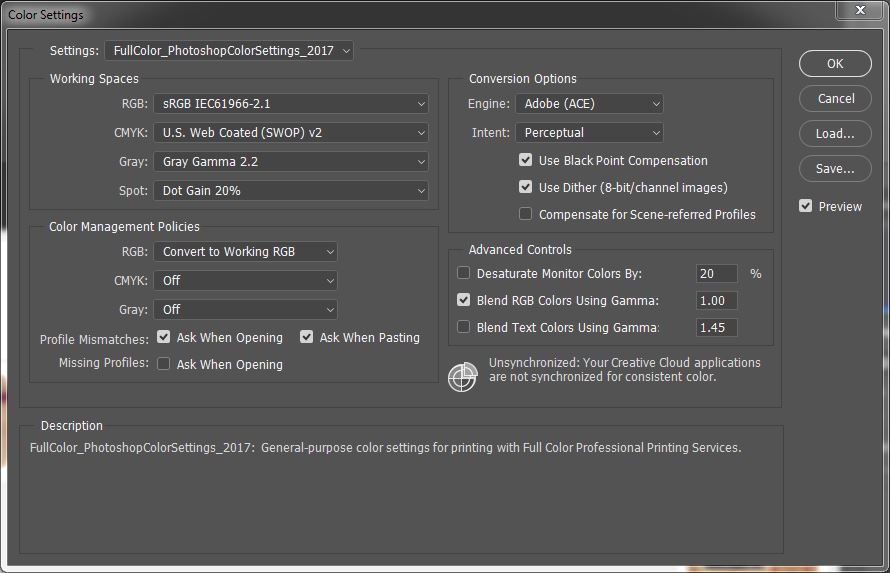
- If using Photoshop, make sure your color settings are correct. (See color setting panel below.)
Calibrating Your Monitor
The best way to profile your monitor is with a hardware monitor calibration device. We recommend the latest calibrite display solution, but there are many calibration packages you may choose.
This device attaches to the front of your monitor and reads color patches displayed by the software. Using these readings, the software removes any color cast from your screen, helps optimize the brightness, contrast and color output, and creates a profile describing how your monitor displays color. Photoshop then uses this profile when displaying images to give you the most accurate color display possible. Laptop computers are not recommended by Full Color as a viable solution for a properly calibrated monitor.
Note: We suggest setting your target White point to 6500k and Gamma to 2.2. This is only a recommendation; you may find that your viewing environment has warmer or cooler lights, in which case you could experiment with a white point between 5000-6500k.
If you have any questions about installing and configuring the monitor calibration system you purchased, please refer to the manufacturer's specifications and/or help videos.
We recommend re-calibrating your monitor once a month.
Before Getting Started
When color correcting digital files to send to the lab, a neutral work space is best. Listed below are several tips on creating a neutral environment.
- Lighting in your computer room should be consistent; avoid bright lighting and make sure no sunlight is coming in from the windows. Make sure there is no glare on the monitor.
- Avoid using colored wallpapers or screen savers on your monitor; the monitor background should be set to gray or a grayscale image.
- Use a photographic view box to view the control print. The light source to view the control print should match your monitor brightness. GTI Graphic Technology is one source for view boxes.
- Room surroundings should be neutral.
- When working, it is best to avoid wearing bright clothing, as it will reflect in the monitor and change color perception.
Step 1. Working Space & Photoshop & Lightroom Settings
When sending files to Full Color, it is important that each file has a valid ICC profile embedded. We recommend using SRGB as a working color space.
Download Photoshop Color Settings File
To load this .CSF file after you've downloaded it, open Photoshop go to Edit > Color Settings > Load. Navigate to the .CSF file, then click OK.
Photoshop Color Settings in Photoshop 6.0 and above
- Open Photoshop and go to Edit > Color Settings
- Under Working Spaces > RGB select sRGB IEC61966-2.1.
- Under Color Management Policies > RGB select "Convert to Working RGB."
- Next to Profile Mismatches check "Ask When Opening" and "Ask when Pasting." Photoshop will prompt you to convert files whenever you open a file saved and tagged in another color space. If you would rather have Photoshop automatically convert files, uncheck these boxes.
- Next to Missing Profiles, uncheck "Ask When Opening."
- Under Conversion Options set Intent to Perpetual, and check "Use black point compensation."


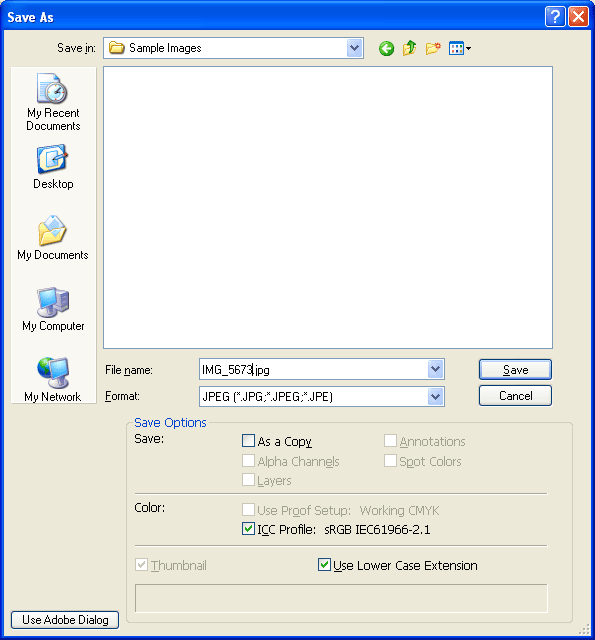
Note: Photoshop will assume files not tagged with a color space are in your working space. When saving JPEGs out of Photoshop, check “Embed Color Profile” in the Save dialog box, as shown here. Leaving this unchecked will result in unpredictable color on your prints.
Lightroom
To assign a color profile to your RAW files in Lightroom you must select the Color Space when exporting your files. Once you're on the export screen, select the Color Space drop down menu. We recommend selecting sRGB. This will apply the sRGB color space to your images once they are exported.

